


Your bungalow is a timeworn blueprint, holding both constraints and opportunities in its grain. As you update it, you’ll need to balance Northwest climate demands with the home’s original proportions, millwork profiles, and daylight patterns. That means selective wall removal, discreet system upgrades, and regionally appropriate materials, not a gut renovation. If you want more comfort, better flow, and stronger curb appeal without erasing its soul, you’ll need to decide where to start—and what to leave untouched.
Key Takeaways
- Start with a clear brief: how you live, desired ambiance, climate needs, and how the bungalow should connect to garden and outdoor spaces.
- Optimize the floor plan by improving circulation, light, and views while respecting structural limits and avoiding removal of key character walls or entries.
- Preserve and repair original Craftsman woodwork, casing, and built-ins using reversible conservation methods; replicate missing profiles accurately.
- Modernize kitchens, baths, insulation, HVAC, plumbing, and wiring with compact, efficient layouts and period-appropriate finishes that harmonize with existing materials.
- Treat walls, ceilings, and floors as a unified envelope, using fine plaster-like textures, matte paints, and colors inspired by existing oak or fir wood tones.
Clarify Your Vision for Updating a Bungalow

Before you start comparing tile samples or moving walls, define how you want your California bungalow to function and feel within its specific climate and neighborhood context. Begin by mapping daily patterns: where you enter, cook, work, and relax. Then align those zones with natural light, prevailing breezes, and privacy needs.
Translate this into a clear performance brief: thermal comfort, cross-ventilation, and outdoor connectivity. Decide how garden landscaping should support that brief—drought-tolerant plantings, shaded seating, framed views from key rooms.
Next, establish interior color schemes that respond to local light quality and period details: warm whites for foggier coastal zones, cooler neutrals inland, accent hues pulled from existing brick, roof tile, and mature planting to maintain architectural coherence.
Assess the Existing Bungalow Layout and Bones
Before you sketch a single new built-in, you need to understand how your bungalow actually stands up—its foundation condition, load‑bearing walls, and roof structure, all in the context of your local climate and soil.
Next, you’ll map the existing floor plan, noting circulation paths, natural light patterns, and how rooms perform for contemporary Midwest living.
With that information, you’ll pinpoint key problem areas—choppy layouts, undersized kitchens, or awkward additions—so any update respects the house’s bones while correcting its functional bottlenecks.
Evaluating Structural Integrity
Although finishes tend to grab your attention first, updating a traditional bungalow in, say, the Midwest or Northeast starts with a hard look at its structural bones: foundation, load-bearing walls, roof framing, and floor system.
Begin with a rigorous foundation inspection, since freeze–thaw cycles, clay soils, and earlier retrofit work often leave hairline cracks, settlement, or displaced masonry that’ll affect any renovation scope and detailing.
Next, complete a roof assessment. In snow-prone climates, you’ll check for undersized rafters, sagging ridgelines, inadequate collar ties, and prior ice-dam damage.
Inside, verify that existing bearing walls align with beams, posts, and foundations, and that joist spans match current loading expectations.
Document all conditions photographically and dimensionally so engineers and designers can develop compatible, structurally sound upgrades.
Analyzing Current Floor Plan
How does the existing floor plan actually work with the way people live in a cold-climate bungalow today? Start by mapping circulation: trace how you move from entry to kitchen, bedrooms, and rear yard, noting bottlenecks and underused rooms. Measure room dimensions, wall thicknesses, and window locations; sketch relationships to your lot, views, and prevailing winter winds.
Assess how the main living areas connect to potential landscaping design—can you see and access outdoor spaces that get winter sun? Evaluate interior lighting: identify dark corridors, single-aspect rooms, and north-facing spaces that need daylight support. Note ceiling heights, bulkheads, and chase walls that may conceal ducts or structure.
Record which walls feel “load-bearing” in behavior, even before formal engineering confirmation.
Identifying Key Problem Areas
Once you’ve mapped circulation and light, you can isolate the bungalow’s real pressure points: cramped entries that dump cold air into living zones, narrow central halls that waste heated square footage, and add‑on mudrooms or porches that interrupt thermal continuity.
Next, read the structure like a regional section drawing: roof pitch, wall thickness, and existing insulation reveal where upgrades are feasible without compromising character.
Assess how poorly planned garden landscaping or ad‑hoc outdoor lighting may be blocking south sun, creating glare, or introducing moisture at the sill line.
Prioritize zones where small interventions liberate multiple gains:
- Entry sequence and air‑lock potential
- Kitchen–dining connection to yard
- Foundation, drainage, and perimeter grading relative to plantings
Open Up Space Without Losing Bungalow Character
In a Midwestern bungalow, you can open sightlines by removing or narrowing select partition walls, but you’ll need a structural engineer to verify which ones carry roof and dormer loads.
As you reconfigure, you should retain key period elements—cased openings, built‑ins, and wood trim profiles—to keep the Craftsman character legible.
Think of it as editing the interior shell so natural light and circulation improve while the original detailing still sets the visual rhythm of each room.
Strategic Wall Removals
Carefully removing or shortening interior walls lets you gain the light, flow, and sightlines homeowners now expect, without erasing the cellular charm that defines a Midwestern bungalow. You’ll work with a structural engineer to confirm which walls are load‑bearing, then replace them with flush LVLs or minimal posts that keep the original room rhythm readable.
Use selective openings to align interior views with your yard’s landscaping design and to support regionally appropriate color palettes—warm whites, coppery greens, and clay tones that echo brick, oak, and prairie plantings.
Focus interventions on:
- Kitchen–dining passages along the central spine
- Cased openings between living and sunroom
- Partial-height dividers that conceal mechanicals while preserving openness
Preserving Original Details
Although you may widen openings and simplify circulation, you should treat the bungalow’s original fabric—trim profiles, doors, built‑ins, and hardware—as your primary design constraints rather than decor. Match new casing and baseboard to existing dimensions and radii; don’t substitute generic “craftsman-style” stock.
When you insert new beams or cased openings, align head heights with original door heads so the rhythm reads continuous.
Preserve wood species and stain where possible, then coordinate interior color schemes to bridge original dark millwork with brighter, contemporary walls—warm whites and desaturated greens work well in most temperate-climate bungalows.
Outside, let garden landscaping reinforce this character: use low stone edging, axial paths from porch to sidewalk, and layered native plantings that echo the bungalow’s horizontal lines.
Modernize Kitchens and Baths in a Traditional Bungalow

While a 1920s Pacific Northwest bungalow often hides cramped utility spaces behind its charming millwork, you can modernize the kitchen and baths by upgrading performance without erasing original character. Start with a tighter work triangle and high‑efficiency fixtures sized for modest rooms. Specify induction ranges and panel‑ready dishwashers to keep sightlines quiet and period-appropriate.
Use your exterior palette and even Gardening tips to guide interior material choices, echoing porch stone or shingle tones in tile and countertops. Calibrate each Paint color to low winter light and overcast skies, favoring warm neutrals over stark whites.
- Upgrade plumbing to support multi‑head showers and on‑demand hot water
- Integrate ventilation sized for damp coastal air
- Layer under-cabinet and mirror lighting for glare-free task zones
Refresh Bungalow Finishes While Honoring Original Details
In a Pacific Northwest bungalow, you’ll get the most impact by preserving original Craftsman woodwork while upgrading worn surfaces with restraint. You assess casing, built-ins, and beams for repair rather than replacement, then specify finishes—like low-sheen, waterborne varnishes and historically appropriate paint palettes—that respect the home’s early-20th-century character.
As you introduce new tile, flooring, and wall treatments, you match scale, proportion, and materiality to the existing millwork so updates feel cohesive, not competing.
Preserving Craftsman Woodwork
Because Craftsman-era bungalows across the Upper Midwest rely so heavily on their millwork for character, any update should start with a careful assessment of the existing wood species, finish system, and profiles. You’re often working with quartersawn oak, fir, or maple, each responding differently to stripping agents and new sealers, so accurate identification is critical for disciplined Woodwork restoration and preserving authentic Craftsman craftsmanship.
Focus first on protection, then on unobtrusive repair:
- Document casing, base, and rail profiles before modifying, so local millwork shops can replicate lost pieces.
- Use reversible conservation techniques—shellac touch-ups, wax fill, dutchman patches—before resorting to full refinishing.
- Calibrate sheen and stain tone to regional precedents from Duluth, Minneapolis, or Milwaukee archives, not generic “craftsman” palettes.
Updating Surfaces Sensitively
Once you’ve stabilized the original millwork, surfaces become the next major variable in keeping an Upper Midwest bungalow honest to its era. You’ll treat walls, ceilings, and floors as a continuous envelope, calibrating surface textures to manage low winter light and summer glare.
Use fine to medium plaster-like finishes or skim coat drywall rather than heavy knockdown. They echo original lath-and-plaster without pretending to be it. Specify eggshell or matte sheens to soften strong daylight off snow.
For color palettes, pull from existing oak or fir: warm taupes, putty greens, mineral blues, and muted rusts. Reserve saturated hues for dining rooms or inglenooks.
On floors, choose site-finished, low-sheen stain so new boards visually mediate between patched originals.
Boost Storage and Built-Ins for Bungalow Living
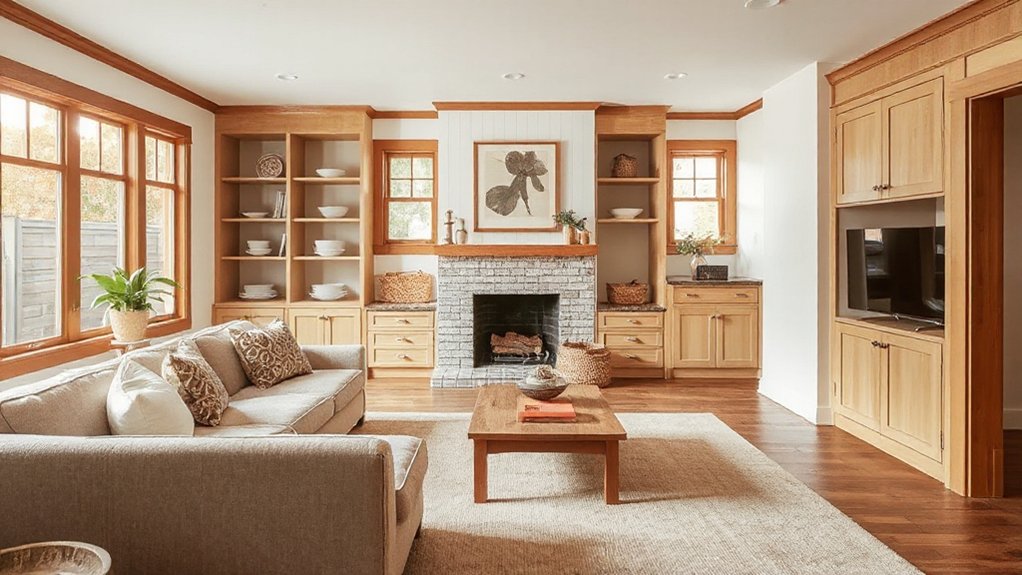
Although Denver bungalows charm with their craftsman details and compact footprints, their original floor plans rarely suit today’s storage needs, so you’ll need to treat every inch like potential built-in real estate. Start with the natural nooks: chimney chases, stair landings, and thick plaster walls often conceal cavities perfect for custom cabinetry that echoes existing casing profiles and vintage fixtures.
Prioritize storage that strengthens your home’s connection to the outdoors and future landscape enhancements:
- Integrate window seats with deep drawers under front bays to frame mountain light.
- Add mudroom-style built-ins at the back entry for boots, skis, and leashes.
- Wrap dining rooms with flush inset buffet storage, matching historic stile-and-rail doors.
Improve Comfort, Insulation, and Energy Efficiency
Denver’s bungalows often bleed heat through original single-pane windows, uninsulated crawlspaces, and balloon-framed walls, so improving comfort starts with tightening the building envelope in a way that respects historic character.
Begin with a blower-door test to locate air leaks at rim joists, attic hatches, and around original trim.
Dense-pack cellulose in wall cavities and R-49+ blown insulation in the attic work well with Denver’s freeze–thaw cycles.
Upgrade windows with interior storms or high-performance wood replacements that match divided-lite patterns.
Underfloor mineral wool or spray-foam insulation over crawlspaces keeps floors warmer without raising finished height.
Extend efficiency outdoors. Thoughtful landscape design—deciduous street trees, pergolas, and covered porches—provides passive solar shading and wind buffering, improving comfort in adjacent outdoor living zones year-round.
Update Electrical, Plumbing, and HVAC Safely and Discreetly
When you modernize a Denver bungalow’s systems, the goal is to bring electrical, plumbing, and HVAC up to current code without telegraphing the work. Start with a full assessment of knob-and-tube wiring, galvanized supply lines, and uninsulated duct runs common in pre-war homes. Coordinate with trades who understand brick veneer, shallow basements, and freeze–thaw conditions.
- Run new circuits through existing chases, then integrate creative lighting with period-appropriate fixtures and dimmers to avoid visual clutter.
- Repipe with PEX or copper, using manifold systems to minimize wall openings and protect against Denver’s freeze risk.
- Upgrade to a right-sized, high-efficiency furnace or heat pump, routing low-profile ductwork under floors. Ensure exterior condensers visually recede behind exterior landscaping, without compromising airflow or service access.
Enhance Curb Appeal and Porches on a Traditional Bungalow
Thoughtful system upgrades inside a bungalow only reach their full value once the exterior reads as cared for, period-appropriate, and tuned to Denver’s high-altitude climate.
Start with the porch: preserve original brick piers, wood posts, and rail profiles; use semi-transparent stains that tolerate intense UV. Choose historically compatible colors with higher LRV on trim to counter strong sun.
Design garden landscaping for low water and winter interest: native grasses, rabbitbrush, and serviceberry handle freeze-thaw cycles and reflective heat from sidewalks. Keep plant heights stepped to maintain views of key architectural lines.
Layer exterior lighting carefully: shielded sconces at the porch, 2700K LED path lights integrated into planting beds, and subtle uplights on key columns—always avoiding glare that fights Denver’s clear night sky.
Plan Budgets, Phasing, and Hiring the Right Pros
Although it’s tempting to jump straight into finishes and fixtures, you’ll preserve both character and budget by structuring your bungalow project around a clear scope, realistic numbers, and the right team.
Start Budget planning with a line-item spreadsheet: structural repairs, systems upgrades, envelope improvements, then interior finishes. In older bungalows, allocate contingencies of at least 15–20% for hidden defects common in regional clay soils, freeze–thaw foundations, or outdated knob-and-tube wiring.
Phase work so envelope and systems happen before aesthetic upgrades:
- Re-roofing, masonry repointing, and window restoration
- Electrical, plumbing, and HVAC right-sized for your climate zone
- Interior insulation, plaster repair, and custom millwork
For contractor selection, prioritize firms with documented bungalow rehabs, detailed bids, local permitting savvy, and proven coordination with preservation-minded architects.
Frequently Asked Questions
How Do Bungalow Updates Impact Resale Value in Different Neighborhoods?
They affect value differently; you’ll see higher resale premiums where neighborhood trends favor preserved façades, energy retrofits, and porch livability. In historic districts, prioritize period-correct detailing; in emerging infill corridors, emphasize open-plan reconfiguration, ADU potential, and resilient regional materials.
Are There Tax Credits or Grants for Renovating Older Bungalows?
You can often leverage tax incentives and renovation grants, especially in historic districts. You’ll check municipal heritage registers, state preservation offices, and energy-efficiency programs; document period-appropriate work, energy upgrades, and seismic improvements to qualify regionally.
How Long Does a Typical Bungalow Renovation Timeline Take?
You’ll typically face a 4–8 month construction timeline. In the Midwest, key renovation milestones include structural remediation, envelope upgrades, rough-ins, inspections, then finishes. Heritage permits, lead abatement, and winter conditions can extend duration and staging complexity.
What Insurance Changes Are Needed During and After a Bungalow Renovation?
You’ll adjust Insurance requirements to add renovation coverage, raise building limits, and list contractors as additional insureds; afterward, you’ll update replacement-cost valuations, remove course-of-construction endorsements, and confirm Alberta-specific code-upgrade and sewer-backup protections.
How Do I Live in the Bungalow Safely During Major Updates?
You phase interior design work room‑by‑room, seal off construction zones, and maintain clear egress paths. You upgrade temporary ventilation, monitor CO and dust, secure tools, illuminate outdoor landscaping walkways, and verify Ontario Building Code fire‑safety compliance throughout.
Conclusion
When you update your bungalow, you’re not just renovating—you’re editing, refining, and regionalizing. You protect original trim, yet discreetly rewire; you retain heavy beams, yet quietly insulate; you respect porch proportions, yet re-grade and re-landscape for drainage. By planning in phases, specifying climate-appropriate assemblies, and choosing trades who understand local vernacular details, you’ll create a bungalow that performs to contemporary standards while still looking—and feeling—authentically of its place.